Wednesday, January 30, 2013

diy heart magnets

Along the theme of my new Valentine's day outlook (read about here), I decided I wanted some cute little hearts for the fridge. Not for any reason and not necessarily as Valentine's day decoration, just some cute as heck hearts to go around cutesy messages on the fridge (naturally).

Again, I used Crayola's air dry clay (can I get an endorsement here?!). Except this time, I moulded the hearts so they would be three dimensional instead of flat.


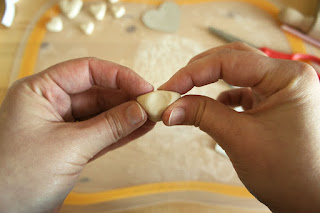
Pinch off a bit of clay and roll it into a ball.


Start by forming it into a fat rounded triangle shape.


Continue pressing and squeezing and rounding until you start to get something resembling a heart. The heart is a tricky shape and it took me a while to get the best shape I could. I found it helped to draw a heart on a piece of scrap paper (about the size that you're working with) and then push and mould the shape on the drawn heart (using it as a guideline). Also make sure the back is nice and flat so you have a solid surface to glue your magnet to.


Once you have your hearts shaped (in various sizes if you like), allow to dry. Since these are a lot thicker than a flat shape would be, I let mine dry for two days before attempting to do anything more with them.

After they've hardened, grab some little magnets (I used magnet tape that I could cut down to size) and a glue gun and simply glue a magnet to the back of each heart.


Once the glue is dry, you can go ahead and paint them any colour you like. I used watercolour paints that I mixed to produce different shades of pink and red. I also found it was a whole lot easier painting them when they were attached to a metal surface. The hearts were a little too small to hold and paint.

Allow to dry again and apply a coat of mod podge to seal them up.

Stick 'em on a magnetic surface and enjoy!

{good to know} I immediately dropped one after putting it on the fridge (that's freezer height to wooden floor) and it didn't break or chip! These guys seem pretty solid!

Friday, January 25, 2013

greek pinks


this was (by far) the best shade of pink I've ever seen


{the end}

Wednesday, January 23, 2013

diy heart headphone cord wrap

I'm seeing Valentine's day in a completely different light this year. After scrolling through page after page of Valentine ideas (to get some inspiration), I realized something. Valentine's day has turned into yet another way for us to celebrate the men and children in our lives.

And you know what? That's wrong.

Let me explain. Don't men and kids have enough holidays to call their own already? Christmas, Easter, Father's day, Halloween, Thanksgiving (come on, you know this is for them, too. I don't hear men discussing turkey recipes every year). So what holidays does that leave us with -- the ladies? Mother's day? Thanks, Hallmark, but that still alienates a lot of us as you kinda gotta be a mother for that one.

So I'm taking back Valentine's day. If there's any event that should be 100% about celebrating the lady in your life, it should be this one. I've gotten a few diys ready for Valentine's day, but they are specifically for things that I would want or things that I need or that I like.

And that's where this little headphone cord wrap comes in. I was getting tired of finding my earbuds in a jumbled mess in the bottom of my bag and one thing I really wish had been included with my new iPod was the little headphone case that Idle Husband got with his iPad. It's a really nice way to keep and store earbuds, and I wanted to have something like this, too.

I spotted a tutorial for a gingerbread earphone cord keeper (which looks like a tiny way to adjust the cord length on earphones) and that's when inspiration struck. I just needed something bigger.


I used Crayola's air dry clay (which I've been using for so many projects lately). Just take a good chunk of it and roll it out flat. You don't want to roll it out too thin. The thickness needs to be pretty substantial to keep the heart flat while the clay dries and also to give it some strength. Remember, this is going to hold a wrapped cord and be floating around in your purse soon!

Grab a heart-shaped cookie cutter (or any cutter you want, really) and punch out the heart shape. Carefully remove the extra clay from around the heart.

{good to know} I almost always make more than one clay item when I'm working with this medium (you can see the extra hearts in the top photo). If anything should go wrong during any stage, I have a back-up. The drying process is a little time consuming and it really sucks to have to start all the way back at the beginning! (Besides, the extras I make usually serve as testers for paint colours or techniques and if they still turn out pretty good, they can also be gifts!)


Next use a straw or something similar to punch two holes into the sides of your heart. Punch them around the middle of the heart and kind of close to the sides. Just make sure to leave enough room at the bottom so there's enough of the heart stem left. You don't want that snapping off later!


Use a knife to cut out little notches that go into the holes you just created. This is where the cords will slip in.

Now you're going to want to let your heart dry at least overnight.


In the morning, grab a damp sponge and use it as a sanding tool to round the edges and buff off any sharp bits of clay.

I left mine to dry for another day after this sanding.

Once dry, you can paint it however you like or leave it plain. I used a watercolour paint for the pinkish red hue and I used an acrylic for the gold dip. Then seal the whole thing up with a coat of mod podge. (I definitely have to buy some more podge. Mine has glitter in it from the dinosaurs!)

Once everything is completely dried and cured, wrap your headphones around the heart and stuff it in your purse!

This is going to be so handy and it's exactly what I wanted! Thanks, me!

Friday, January 18, 2013

friday fixations: youtube edition


{wem diving} This mostly disturbs me because I shop there.


{bacon pancakes} We were crazy obsessed with this song while travelling. I think it kept us sane (we're, like, 5, I know). Here's a link where you can find two remixes for download (head explosion!)!


{the cat} This had us giggling (in Greece; which probably says more than I ever could).


{kung fu mom} Such an inspiring story.

Wednesday, January 16, 2013

Friday, January 11, 2013

friday music mix

I've been debating all morning whether to go out for a walk today. I went yesterday and immediately regretted not having checked the weather first (or worn any long johns). I shouldn't be such a baby (this isn't too bad), we've just been really spoiled for pretty good winter weather lately. These songs made up my gifted Christmas mix this year. I hope you hear something you like!


{A.C. Newman} Encyclopedia of Classic Takedowns
{Father John Misty} Hollywood Forever Cemetery Sings
{Gold Motel} Brand New Kind of Blue
{Hesta Prynn} You Winding Up (Bear Hands Remix)
{Kishi Bashi} It All Began With a Burst
{Lady Lamb The Beekeper} Rooftop
{Major Lazer} Get Free (featuring Amber Coffman)
{Mind Enterprises} Summer War
{Passion Pit} Carried Away
{St. Vincent} These Days (Jackson Browne Cover)
{Stealing Sheep} The Mountain Dogs
{Still Corners} Fireflies
{Teen} Electric
{The Dø} Slippery Slope
{Theme Park} Wax

Wednesday, January 9, 2013

Friday, January 4, 2013

friday fixations: free printable 2013 calendars

There are so many great designers offering free printable calendars every year that I just don't understand why people even bother to buy a generic (and expensive) calendar anymore. I just printed four calendars that I made for myself and my mom and it cost me all of $25 bucks (I printed them at Staples on cardstock and the quality is so much better than printing them at home). Last I checked, that's almost the price of one calendar at the calendar shop (or is it the price? I haven't purchased a calendar from one of those mall shops for almost 10 years now -- is there such a thing as calendar inflation?).

Here are some free calendars that I especially loved this year (but didn't print):


Source: fun.kyti.me via idle on Pinterest


Geometric with large poster capabilities! (It also comes in black and white.)


This is my favourite one!

Source: mibo.co.uk via idle on Pinterest
I really like the formatting on these. That's something I might attempt next year.

These are too cute! (But I think I would've been tempted by sweets all year!)


Source: fotocrush.com via idle on Pinterest

I also really liked Scout Creative's free printable calendar this month and did print that one (resized as a mini calendar instead). They've switched from 3D calendars (you print, cut out, fold, glue, and display equaling too much work) and moved to desktop calendars with a free printable card calendar. I was so over the 3D printables they were sending out every month last year, I didn't even consider printing a single one. So, obviously, I'm really happy they changed their format! Sign up for their club and get the printable AND a desktop option delivered right to your inbox every month!

january_zodiac

And, in case you missed it, I'll be posting a printable zodiac/lunar calendar every month that you can print out for free, too. January's already available right here.