Friday, December 7, 2012

friday fixations: advent calendars

Even though we're already a few days into December, I keep coming across beautiful versions of advent calendars. I just had to throw together a few of my favourite ideas from this year.


Source: ohhappyday.com via idle on Pinterest


I love love this idea! I'm so mad at myself for not thinking of it first, actually. I saw the tree at IKEA (clever guys) a while back and instantly fell in love with the concept, but then I stood there forever pondering what on earth I could do with it. It goes without saying, though, that I would not go through the trouble of ordering felt ornaments online. I'd make them myself or I might even use paper for the ornaments with Christmas to-dos written on the back so I could easily change them out every year (or leave the tree as is because that's beautiful too).


Source: minieco.co.uk via idle on Pinterest

These pyramids are so modern and funky! I kinda want to take the numbers off and just use them as neat tree ornaments. (It makes me sad to think they'll be opened for what's been hidden inside.)


This isn't originally an advent idea. It's just some paper trees hung with washi tape, but I thought they would make a really cute advent calendar. Just write a fun suggestion on the back of a tree and hang. I wouldn't even number them, I'd just turn them over at random. I also really like how they're stuck on a door. It enters the territory of modern wreath, too.


If you aren't into the traditional nativity scene, this'd make a nice edition to an empty table top. While I adore neon, I wish the colours were a little more festive (neon green and neon red? I dunno). There is a black and white version which would look extra cute if you found a tiny someone to add a little colouring pre-assembly, though.


You can purchase this advent calendar, but all you really need is a long piece of wood and a drill bit and you'll be in business. I can see this sitting in the middle of a table as part of a centerpiece.

Source: hgtv.com via idle on Pinterest

Pro: You can fit a ton of fun stuff in a take-out container! Con: Take-out containers take up a ton of table space! Maybe you could use those cute little mini containers instead.


Finally, I thought it was really cute to make your calendar entirely out of cookies. (There's also a gingerbread version.) But, to be honest, in our house, I don't think they'd make it to 25!

There are a few more ideas on my Christmas Pinterest board and, if you missed it, don't forget to check out my advent calendar this year. I still think my origami balloons are the cutest!

Saturday, December 1, 2012

december desktop calendar

1920by1080xmasdesk

With the hustle of Christmas, I thought I'd provide you with a pretty but simple desktop this month. These are light drags from our Christmas tree lights which I thought looked artsy and modern.


Also available are the printable wall calendars:


I haven't decided if I'm going to make another printable calendar for 2013 yet. I have to look through my pictures, but I don't think there're enough worthy ones. Would you miss it?

Wednesday, November 28, 2012

foodie christmas decoration


I know I said I was tired of wreathes, but somehow, the Christmas wreath still makes sense to me. Plus, as I was cleaning out my pantry, I had a great idea for my wreath decorations and I couldn't exactly ignore myself now could I?

I bought this plain wreath at the thrift store last year. It had nothing on it. Please see last year's post for the full story and to see what last year's decorations were.

Anyway, while cleaning up the pantry, I decided I should pull out my cookie cutters because I had thought to string them up on the tree and then I remembered that during the summer, I came across some small cooking utensils and fake vegetables. They were only a buck and I thought they'd look so cute on the Christmas tree as decorations. I still had the fancy dried corn out from fall decorations and many other prop ideas came to mind, hence the foodie wreath was born.

I attached everything with bits of floral wire which I got at the dollar store. I think that's the single most versatile purchase I've ever made there.


The only thing I bought was some pasta. First, the penne for a garland. I was going to dye them Christmas colours but decided I liked the natural pasta look better. There're some fake tiny tomatoes from my fake vegetables and you can see a tiny wooden bowl in the background.


Second, I bought a bag of bowtie pasta for little bows (obviously).


Fake beet! Oh the cuteness!


Fake carrot! And some cookie cutters. I liked these solid types for the wreath because they were a little easier to see than the usual cookie cutter types.


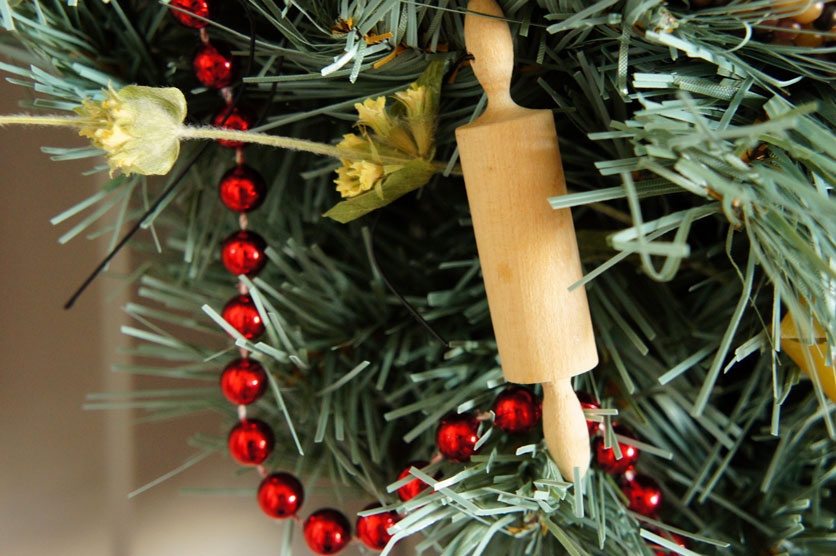
Tiny rolling pin and I added a medium sized pin that came with a ravioli making plate I have. Both of which I've never used. The red beads are a store-bought garland I already had. I thought they made nice "berries." An alternative could be some of those fake beaded necklaces you can find in abundance at thrift stores.


A real clove of garlic! Just push a piece of floral wire right through the whole bulb and tie it on. Those little green and yellow flowers and stems are sprigs of Greek mountain tea. Idle Husband's mom has sent me far more than I'll ever be able to drink in my lifetime (I have a huge peanut jar filled with the stuff plus three arm-sized bags of it). There's no need to wire them on, they'll stay if you just shove them in.

Some other items that were not pictured or hard to see: dried mushrooms (you can buy these literally anywhere and are really tasty once rehydrated, but I also attached wire to them and added them to the wreath), fake grapes, tiny cutting board, tiny mallet, tiny whisk... I just thought it might be nice to add some bay leaves or other herbs, candy canes or wrapped candies, gingerbread men... I mean, there're so many different ways you could go with this idea!


For the outside of the house, I wanted to do simple swags with the garland and lights this year, but I felt like there should be something at the top of each swag. Out came the mountain tea! I made little upside-down bouquets of the stuff, twisted it together with the floral wire, then added a cookie cutter (that I know I'll never use) to the top. I'm not 100% sure I like the cutters (they're kind of hard to see), but I really like the mountain tea bouquets (plus they smell so nice!).

To attach the swags, I used (you guessed it) floral wire! I just put two pieces together so I'd have a long enough wire to go around the railing. There was enough length left on the wire to also attach the mountain tea bouquets.


And that's how I've done up the front of the house this year. It's something a little different than the typical Christmas fodder, but it's still pretty Christmas (who's NOT cooking and baking at this time of year?) and it fulfills one of my main objectives for Christmas decor: It MUST look good during the day when the lights are off.

I hope that gives you some outside-of-the-box (and cheap!) ideas for decorating your home, wreath, or tree this year!

Friday, November 23, 2012

quick origami balloon advent calendar

I've noticed that there have been a lot of tutorials for origami water balloons this year, so when I finally decided to pick up a piece of paper and test out the folds, I had the idea to use them for a quick little advent calendar. You might think that making 25 origami balloons would be really difficult and time consuming, but this is one of the easiest origami figures I've ever made and I found the folds to be very basic. After you make two or three, you'll figure out the quickest way to make them. Generally, I would fold all of the creases for one side and then do the other (less flipping).

It took me one Saturday to complete the whole thing and would have gone quicker if I hadn't been trying different methods for the advent portion along the way. One hint I'll give you is to find yourself a thimble for your creasing thumb. Mine got awfully sore around halfway in!

Here's what I did:


Start with a piece of square paper (origami or otherwise) pretty side down (if it has one). Fold it corner to corner.


Then fold it again corner to corner.


You'll end up with this. A little triangle! Unfold it now. (How contrary.)


Using the lines you just folded as a guide, fold the paper into a sort of cross and flatten the sides together so you've got a triangle like this:


Flatten the whole thing down.

Next, follow these folds on both sides of the triangle:


Once both sides are folded as such, lift up one of the four flaps and fold up against the middle triangles.


Fold the edge that extends past the figure back in to make another little triangle.


Open one of the middle triangles (they're like little pockets) and tuck the triangle you just made into that pocket. Do this for all four flaps.


They should tuck inside pretty neatly.

You'll end up with a figure that's got a clear closed end and an obvious open end (well, it should be a tiny-ish hole). Don't blow them up yet (as tempting as it is!).

If you hate my instructions, I found these pretty helpful when I was first figuring it out and, as always, it's best to do a practice figure on a piece of scrap paper first!


This next part is kind of up to you. If you've got different colours of paper like I have, you might want to arrange them in a nice colour order so you don't just get a whole bunch of one colour for two weeks. Then you can number them if you like. The only thing you have to watch for is that the numbers are facing up with the closed point also pointing up. That's important or you'll get upside-down numbers when you go to hang them.

I decided to use a stamp for the numbers, but you could also hand write them or leave them blank. The smooth side of the balloon is another good place for a number if you want. You just have to fold the figure in half lengthwise. I debated for a while on how best to do this. I even thought to leave them blank and put the number on the little flag.


Next, ready the balloons for hanging. This is as easy as grabbing a needle and thread and pushing it through the top or closed part of the balloon and tying the ends to form a loop.


Now the fun part of the advent calendar! I decided to go with written notes and things to do this year instead of using actual candies and treats (some of the written ideas, though, are just for us to get candies or treats), and then I wrote them on a little flag. Just take a skinny rectangular piece of stock paper, fold it in half at a slight angle, and cut the corners to look like little paper ribbons. 

Write a fun thing to do on one side of the folded ribbon so you have a written side and a clean side.

You can now blow up your little balloons! Finally we're getting somewhere, right? How exciting! If you find any of them to be a little harder to inflate, gently ease the folds out with your fingers.


Now remember the corners that served as little pockets when you were folding? They're going to be little pockets again for your little paper ribbon. All you have to do is shove it in there with the writing facing in so you can't see it until you pull it out on that day.


I look at an actual calendar when I'm adding the flags. I don't want to have something like, "Go see a new movie" on a week day when Idle Husband's working. I try to pair things up with the dates so they make sense with what we'll be doing at the time.

I hung mine up on a piece of driftwood that I have hanging on the wall.  I also think that if you dedicated an entire mini tree to these, it would look really cute, too.

Another good thing to mention is that even though the balloons look really delicate, they're actually pretty tough, so when Christmas is over you'll be able to (carefully) flatten them back down and pack them up to reuse them again next year.

Friday, November 16, 2012

friday fixations

{my pf flyers} I found these awesome sneaks at the thrift store for $10 and didn't really think much of them except that I loved the colour (burgundy is my new favourite colour, fyi), they're leather (winter perfect!) and they're comfy as hell (plus the heel is a little lower, so I can leave them laced and still slip them on). And then, after many weeks, I finally got around to looking up the brand and discovered that I scored a major deal when I found them, so now I'm extra pleased with them (and myself). But I do have to say (again) how friggin' comfy they are. I wore a pair of my old shoes after wearing these for a week and my feet were killing me within an hour. How was I walking around without these?!

{spoonflower} I thought they were amazing for making your own fabric designs (not like I have, but I'm happy to know I could), but now they have design your own wallpaper and wall decals?! How great is that? Plus if you're not artistic, there are plenty of other handmade designs from artists to choose from that I guarantee you won't find anywhere else!

{pictures of claire danes crying} I knew I wasn't the only one who finds her crying disturbing.

{krisatomic's christmas gift guide} This is totally how gift guides are every. single. year! (That doesn't keep me from being obsessed with them, though.)

{dehydrating} I think I mentioned my dehydrator before, but I just have to mention it again. I made the most crispy apple chips in it the other day, and I dehydrated some tomatoes which, at first, I didn't think amounted to much, but after plumping them in hot water, I realized they were the most amazing concentrated tomato bits I had ever tasted and are p e r f e c t on pizza.  What I'm currently contemplating on drying is some kale (as in kale chips that are dried instead of baked) and I kinda wanna try making some pumpkin pie fruit leather with my pumpkin puree. Also mom spotted beet chips in a mag and went gaga for them which I immediately thought would be a great Christmas foodie gift. If you see a dehydrator on the cheap... you know, maybe you should get it.

{freaks and geeks} I just finished watching its ONE season and I'm so bummed it's over! It reminded me how awful high school is (and makes me wish I had done things differently) plus I kinda enjoyed seeing some of today's actors as their younger selves (Seth Rogen, James Franco, Jason Segel, Busy Philips, Lizzy Caplan -- Ben Stiller cameo?!). I need a new Netflix series. Got any suggestions?