Showing posts with label hints. Show all posts

Wednesday, June 26, 2013

diy: gardening hand scrub

Oh my gosh I've been so busy lately! There's just so much to do in the summer (especially since we only see maybe, if we're lucky four months of it).

So if you're like me, you're probably out there, too. Mowing and weeding and digging and planting and generally getting downright dirty.

I had seen a lot of scrub tutorials, face and body mostly, so I went on a little search for a hand scrub. I guess a gardening hand scrub, as I'm calling it here, but really you can use this for any time your hands just need a little extra cleaning.

On the whole, most "gardening" hand scrubs I read about had sugar mixed with hand-friendly dish soap. And that's totally fine. If you like washing your hands with dish soap. I know, I know. It's Palmolive or hand-softening or what have you, but I just don't like those (and don't think I haven't tried them, either. I felt like they neither softened my hands nor cleaned my dishes).

So mine's probably a bit of a cop out cuz I kept the sugar but used a favourite hand soap instead. It doesn't really matter what soap you use, the method's still the same.

I made enough to fill this jar and I've already used a lot of it! It scrubs really well and surprisingly leaves my hands feeling a lot softer and less tight and dry than they usually are. I don't know if the sugar has anything to do with it, but I do know that this is one of the better uses for sugar!

So here's how you do it:

Grab the jar you want to use (honestly, I've been scooping a bit out with my fingers, so choose something you can dip into.) and fill it 3/4 of the way full of sugar. That's just about two finger widths from the top of your vessel (or consult a measuring cup to get a better idea if you need to, but it's not an exact science). Pour the sugar into a bowl and slowly add liquid soap and mix until you get a medium-thick paste. You don't want it to be all sugar and you don't want it to be all soap (initial experiments had too much soap and the sugar ended up dissolving into the soap so I really just made myself some sweet soap). It shouldn't be drippy, let's put it that way.

And boom! You're done! That was easy, hey?

If you're going to a BBQ or a picnic party, I think this would make a pretty good hostess gift, as well. Include a little spoon and maybe some gardening gloves and you're all set.

Friday, February 15, 2013

friday fixation: colour dipped marshmallows


I had this weird idea yesterday to colour dip marshmallows as an unexpected Valentine treat. I didn't think they'd turn out at all, but they ended up working so well and looking so cute that now it makes me want to colour-dip the whole bag!

Just add a few drops of food colouring to some water, then dip in a marshmallow. Set it aside on a cooling rack to dry. The amount of colouring and water is up to you depending on how dark or light you want the colours to be.

That's it! Super simple, right?

Wednesday, December 19, 2012

diy modcloth inspired dinosaur ornaments

If you don't know by now, I really love dinosaurs. So when I saw this:


Source: modcloth.com via idle on Pinterest


I knew I had to make some myself.

The hardest part of this whole project was finding the dinosaurs. I knew I'd seen them at the dollar store at some point in time, so every time I visited a store this year, I made a conscious effort to look for them. I'm not kidding when I say I found the packages about five days before our vacation. Of the bags of plastic toys in the dollar store, the dinosaurs definitely go first. I must've lucked out and been there on a "just stocked" morning.

Next, gather some glitters and some eye screws, cheap paint brushes and mod podge.


Screw the eye hooks into the dinosaurs first. I used a piece of string wrapped around their bellies to figure out where they balanced so I could screw the hook in at that point. You want to make sure that once you attach a thread through the hook, they'll be weighted correctly and won't hang awkwardly face down or tail up. I thought I'd need a pair of pliers to hold the screw while screwing it in. I thought I'd even need to use a hammer to get it started. But this step was the easiest step in the whole project. Just screw it in with your bare fingers.


All that you have left to do is decorate them to your little heart's desire. Paint on a thin layer of mod podge (plain white glue might work, too), dust it with glitter and knock the dino over a sheet of paper to get the excess glitter off.


Naturally, I remembered a better way to glitter when I was about finished this project (because glitter's kind of the pain-in-the-ass of the crafting world). What you should do is get as many little bowls and spoons as you have glitter colours, fill each bowl with a different colour, then use a spoon to sprinkle the glitter on your dinosaur letting the excess fall back into the bowl. Don't sprinkle the glitter out of the container, over the dinosaur onto a sheet of paper, then use the paper to redistributed the sparkles on spots you missed. It works, but you'll end up with a very glittery mess (like me! You know it's been a good glitter craft when you find a collection of assorted glitter colours under your wedding ring, all over your pants, all over the table, and all over the floor).


Obviously, you can add as much or as little glitter as you want. My favourite dinos are the ones that had multiple layers of colours already on them, so I just followed those lines when applying the glitter. If you want multiple colours, too, just add the glue where you want one colour, add the glitter, let it dry and THEN do the next colour.


My inspiration dinos also had little tinsel collars which would be really easy to apply by gluing on tiny garland pieces. I also had the initial idea of cutting out tiny scarves from scraps of felt to glue around their necks, but once I glittered them, I just really loved the simplicity of the glitter so that's where I stopped. But feel free to go crazy mad with decorating power!


The final step is to apply another thin coat of mod podge to seal the glitter and keep it from infecting the rest of your ornaments (and your fingers) for years to come. It might be helpful to set something up for drying (especially if some of your dinos don't stand on their own like mine). Here's my rig, an indoor clothes drying rack, a paint brush (or skewer) through the eye hook, and hang up to dry.


Finally, thread a string or ribbon through the eye hook, and hang or use as part of a gift tag on a wrapped present.


The one thing I'm annoyed about is that the dollar store dinosaur packs only come with one carnivore and they were by far the best to glitter. The t-rex is my favourite with the raptor coming in second, for sure.


This is kind of my routine each year. Make a new Christmas ornament then use said ornament as a gift/gift tag on friend's gifts (and I'll even kind of theme the wrapping around the ornament). And usually I give away the very best of the ornaments (i.e. the ones that don't turn out wonky). But this year... I might keep them all or give these two (because their my least favourite!). Whatever happens, I'm definitely going to have a dinosaurs-only mini tree next year.

Wednesday, November 28, 2012

foodie christmas decoration


I know I said I was tired of wreathes, but somehow, the Christmas wreath still makes sense to me. Plus, as I was cleaning out my pantry, I had a great idea for my wreath decorations and I couldn't exactly ignore myself now could I?

I bought this plain wreath at the thrift store last year. It had nothing on it. Please see last year's post for the full story and to see what last year's decorations were.

Anyway, while cleaning up the pantry, I decided I should pull out my cookie cutters because I had thought to string them up on the tree and then I remembered that during the summer, I came across some small cooking utensils and fake vegetables. They were only a buck and I thought they'd look so cute on the Christmas tree as decorations. I still had the fancy dried corn out from fall decorations and many other prop ideas came to mind, hence the foodie wreath was born.

I attached everything with bits of floral wire which I got at the dollar store. I think that's the single most versatile purchase I've ever made there.


The only thing I bought was some pasta. First, the penne for a garland. I was going to dye them Christmas colours but decided I liked the natural pasta look better. There're some fake tiny tomatoes from my fake vegetables and you can see a tiny wooden bowl in the background.


Second, I bought a bag of bowtie pasta for little bows (obviously).


Fake beet! Oh the cuteness!


Fake carrot! And some cookie cutters. I liked these solid types for the wreath because they were a little easier to see than the usual cookie cutter types.


Tiny rolling pin and I added a medium sized pin that came with a ravioli making plate I have. Both of which I've never used. The red beads are a store-bought garland I already had. I thought they made nice "berries." An alternative could be some of those fake beaded necklaces you can find in abundance at thrift stores.


A real clove of garlic! Just push a piece of floral wire right through the whole bulb and tie it on. Those little green and yellow flowers and stems are sprigs of Greek mountain tea. Idle Husband's mom has sent me far more than I'll ever be able to drink in my lifetime (I have a huge peanut jar filled with the stuff plus three arm-sized bags of it). There's no need to wire them on, they'll stay if you just shove them in.

Some other items that were not pictured or hard to see: dried mushrooms (you can buy these literally anywhere and are really tasty once rehydrated, but I also attached wire to them and added them to the wreath), fake grapes, tiny cutting board, tiny mallet, tiny whisk... I just thought it might be nice to add some bay leaves or other herbs, candy canes or wrapped candies, gingerbread men... I mean, there're so many different ways you could go with this idea!


For the outside of the house, I wanted to do simple swags with the garland and lights this year, but I felt like there should be something at the top of each swag. Out came the mountain tea! I made little upside-down bouquets of the stuff, twisted it together with the floral wire, then added a cookie cutter (that I know I'll never use) to the top. I'm not 100% sure I like the cutters (they're kind of hard to see), but I really like the mountain tea bouquets (plus they smell so nice!).

To attach the swags, I used (you guessed it) floral wire! I just put two pieces together so I'd have a long enough wire to go around the railing. There was enough length left on the wire to also attach the mountain tea bouquets.


And that's how I've done up the front of the house this year. It's something a little different than the typical Christmas fodder, but it's still pretty Christmas (who's NOT cooking and baking at this time of year?) and it fulfills one of my main objectives for Christmas decor: It MUST look good during the day when the lights are off.

I hope that gives you some outside-of-the-box (and cheap!) ideas for decorating your home, wreath, or tree this year!

Monday, October 29, 2012

pixy stix

Earlier this year, Idle Husband alerted me to this super awesome site, Stop Zombie Mouth. There you can find some coupons for a free P.C. or Mac download of Plants vs Zombies to give out for Halloween. (Plants vs Zombies is one of my all time favourite games.) 

This started me thinking. I know the coupons are meant to be given instead of candy (you know, to stop "zombie mouth"), but it kinda feels wrong not to hand out candy on Halloween. At first I thought it might be fun to attach the coupon to those smaller-sized suckers, but then I discovered pixy stix at the dollar store.


I haven't officially tasted these (I'm not really keen on having a mouthful of sugar), but Idle Husband seemed to really enjoy them. He sampled one of each flavour and orange is his favourite.


I printed out one sheet of coupons (8) because I'm only going to give the coupons to kids who look old enough (I don't remember there being a lot of older kids -- and by older, I mean waist height -- at our door last year). Then I punched a hole in each side of the coupon and threaded a pixy stick through. Easy!

Download coupons here and test out the game online here.

Thursday, October 25, 2012

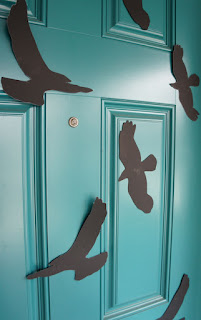
DIY: crow door decor


We love birds around here (even when Hermes is being an angry little dictator), so I thought the most appropriate decoration for our house this year would be crows (last year, I made a monster and went crazy with spiders).

This whole plan almost fell through because I could not find a single acceptable black crow. I was about to default to the Pacman and ghosts idea, when I stumbled on the perfect little crows at Superstore. And just like that my original idea was back on!


For the birds, all you have to do is find some silhouettes of crows through a google image search. Print them out at various sizes (to give the appearance of distance) and cut them out for templates. I used black poster paper that I found at the dollar store for the finished bird.


I also didn't worry too much about detail. Some images have every feather and foot perfectly outlined, but I just wanted to cut out as many as I could in as little time as possible, so I rounded the wing and tail feathers and just used wavy cutting to simulate feathers. Occasionally, I put in a feather slice but only randomly.


I had to do some testing with how to stick them up because tape takes off the paint on my doors. I found that sticky tacky actually does hold in the cold weather (I tested it in my freezer) and I'm even more impressed with it because I put all of this stuff up (in what seemed like) the hour before we had the biggest wind storm of the fall. I was so worried that night cuz I thought I'd go out the next morning and find a door covered in blobs of sticky tack and all my crows blown away, but I only lost one (and that wasn't on the door, I've got some around the window, too). And to further prove it to you, I put these crows up last week and these are pictures I took today. Everything's still holding strong.

The fake crows that I found at Superstore were only $3 which I didn't think was too bad (considering the larger ones I'd found). They did need a little fixing as their legs easily pulled out (and that's the main attaching part), so I added a little dab lot of hot glue and pressed them back in again. They do have wires on their feet for attaching and that seemed pretty good, but I didn't want to chance it, so I used some floral wire to further attach them to the branches of our front tree.

I'm pretty happy with how it all turned out (and I'm a little smug to see that other houses along our block have also now added some black paper crow cut outs to their Halloween decor, too). I did the spider web thing last year and putting it up was kind of a hassle, but taking it down? Trying to get all the webbing off my house was more of a nightmare than Halloween itself (there were STILL small web remnants left on my tree even through summer). This will be so much easier (and my heart bleeds for the house down the street that covered their junipers with spider web this year. Good luck getting that off!).

Friday, October 5, 2012

friday fixations: kristen wiig halloween costumes

We never do Halloween. I mean, sure, we hand out candy occasionally when we feel like it (and frankly, if we still have enough of what we bought for the kids and haven't eaten it all ourselves), but we never go to Halloween parties or bother to dress up (I don't really like dressing up. I'm too aware of how fake I'm being, and I suppose that's the point, but I don't like it. It's makes me feel super uncomfortable). Anyway, every year, I still like to look at Halloween costumes and admire all the creativity and work that goes into them!

These costume ideas just happen to be my favourite costume ideas that I would actually do if I had to. You know, cuz there were those three times in my past where I found myself suddenly having to dress up, so it's good to have ideas in your brain at all Octobers (and yeah, they just happen to all be Kristen Wiig characters. I like her a lot, okay?)


{garth and kat} Cuz Idle Husband and I would do this so well. We're always making up songs. Not quite this terribly, but we're still so funny and random that it could work. Plus matching sweater vests and turtle necks!!


{the target lady} I'm always drawn to costumes that are super easy and aren't really costume-y (plus I can't help but yell to myself, "approved!" every time I swipe the credit card). Idle Husband doesn't like dressing up either, so I think he'd be on board with this one cuz he could dress as the disgruntled customer which would just be his every day clothes (he's always a disgruntled customer).


{gilly} Have I ever mentioned how my secret wish is to have an afro? NO? Well, guess what? It is! At least being Gilly would give me the opportunity to act on that wish even if just for a night. (Idle Husband = annoyed teacher?)


{dooneese} This is (little) hands down my favourite costume idea. I've been thinking about it for.ev.er. It's probably the most difficult to do, but I already have (much of) the forehead (there's a reason I have bangs) so the rest should kind of fall into place. (Idle Husband would obviously dress as the announcer and carry bubbles around with him so I could pop them with my doll hands all night, right?)

Wednesday, September 26, 2012

DIY: cloud pendant

These days, I really love clouds! I saw this pin and wanted some clouds of my own and since I'm kind of fixated on long, over-the-head length pendant necklaces right now, I thought why not throw those two together?!

This is such an easy DIY, I didn't even bother to photograph step-by-step.
  1. Get yourself some air dry clay. I used this (and there's so much of it in one tub, I figure you'll be set for life after this one-time purchase).
  2. Draw a cloud onto stiff paper and cut it out.
  3. Roll out a piece of clay to an even thickness. Then use your paper cloud as a template on the clay and gently cut around the cloud shape.  Don't forget to poke two holes or one hole (whatever suits you) in the cloud so you can eventually attach it to your necklace! (tip: I always make at least two just in case I happen to break one of them!)
  4. Allow it to dry.
  5. Use a damp sponge as a sander to smooth the edges and clean up the surface (I love this part!)
  6. Allow to dry again.
  7. Attach it to a necklace. You can either buy some jump rings and attach the cloud to a chain, or do what I did and use some thin fishing line (I think it's best cuz it's cheaper than beading filament, just as thin, plus has a weighted test to it) and beads to make the necklace strand. (I got the silver seed beads at Walmart of all places!).
You could stop there or you could glaze it, keep it plain, or add some colour to it.

I use this swirly technique. I love it because I never quite know what I'm going to get (except I know it's going to be beautiful), it's easy, it dries quickly, and it's a good way to use up old nail polish. So whenever I make anything out of clay, I eventually gravitate towards this method of colouring it. 

You've most likely seen the DIYs for swirly fingernails, where you give your nails a marbleized look by taking some room temperature water, plopping some fingernail polish on the surface, swirling it, and dipping your fingernails in? That's exactly what I'm doing here! There's no special technique to it. I do it pretty much exactly as it's done on the nail tutorial (minus the petroleum jelly, of course). 

I'm going to be leaving my cloud as is (it's so easy to make that if it should happen to break or get damaged, I'll just make another), but since I really don't know how they'd handle the stresses of every day life (if you get it wet accidentally, etc.), you could also put a coat of glaze over the top for protection once they've been swirled.

Of course, if you don't like clouds as much as I do, you can draw out any image to use as a template on clay and attach it to a necklace (or glue it to a brooch pin -- hint hint) using the same method.

Wednesday, August 8, 2012

DIY: shower curtain


I never mentioned it but I first attempted this in my own bathroom. I used a double sheet and sewed in some buttonholes to attach it. The whole task seemed rather simple in my head but executing it took me a couple days and a few headaches. Not from the sewing itself, but from the calculating and measuring and figuring. It was all worth it, though, because, let me tell you, I've never had a fabric shower curtain. I've always had a plastic one, and you know what? The fabric makes all the difference!

My next mission was a curtain for Idle Husband's bathroom, so when I stumbled on this adorable Space Invaders sheet, it was like fate! Making a curtain the second time around was much easier than the first. I think I picked up a few tips that would help anyone sew up one of these bad boys and you, too, can spend at the very least 3 bucks (yes!) and an hour or two of time on a brand new shower curtain.

{one} Use a template! The first shower curtain I made out of a sheet, I used measurements to figure the length, width, and distance between buttonholes. I thought it would save me so much time but it ended up frustrating the hell out of me and made me do a whole lot of figuring and math (which I really don't like doing). So even if it pains you (and trust me, it pains all of us), remove your existing shower curtain or curtain liner and use it as a guide for your new one. Lay it out, lay the sheet on top of it and mark and copy everything.

{two} Use the hems you've got! If you play it smart, you should only have to hem two sides of your sheet --the sides you cut. If you're using a twin sheet, even better! As I discovered with the Space Invaders sheet (obviously a twin, duh!), you'll only have to hem the bottom as the width is just a touch too small to bother cutting.


{three} Practice making buttonholes on the actual fabric!  It's very important that you practice the stitches on some of the scrap fabric you get from hemming the sheet to size. Thread tension is really important for buttonholes otherwise, you get a lot of pulling and bunching and weird stitches. The only way to make sure it's 100% correct is to practice on the fabric you're actually going to use. My first curtain has a few wonky buttonholes because I used a different sheet material for practice (eh, I thought, all sheets are the same! NOPE). As it turned out, the tension was all wrong for the actual sheet material I used and I didn't realize it until after I'd screwed up a few stitches. The only real saving grace is the fact that the buttonholes aren't very noticeable once the curtain is hung up, so if they are a little crooked don't worry so much about it. And don't forget, it's not like these buttonholes are going to get the use that an actual button would give them, so you don't have to be too technical about getting the stitches spot on.

If this is your first time sewing buttonholes, you'll have to practice making them anyway, and do practice -- a lot! I would give you a tutorial for doing buttonholes, but every machine is different so it's best to look to your particular model to figure it out. Most machines should come with a buttonhole foot (an absolute must) and, hopefully, a manual which will tell you exactly how to do them. There are a lot of great tutorials on the internet if you need visual help, too.


{four} Don't cut out the buttonholes until you do a final check! Make sure you've hemmed it the right way (if your fabric has an up and down), make sure the buttonholes are evenly spaced, and make sure the buttonholes are on the right end of the fabric before sewing. It's a pain in the ass to take out all of your stitches if you've gotten it wrong but it's completely impossible to fix it once you've cut open the slits! I checked the sheet for hemming. Then I marked the buttonhole locations with a pin, which I then traced over with pencil, then I held it up and visually checked it again. Then I sewed the button stitches first, double checked them again, THEN I ripped out the middles. It's a lot of checking but better safe than sorry!

Anyway, the picture doesn't really do it justice, but the curtain is so adorable! It always makes me smile when I see it (the bathroom is just off the stairs so it's the first thing you see when you come up), it lends a brightness and uniqueness to the bathroom (where are you gonna find that curtain in the stores these days?), and the fabric cost me all of $3! Would it be overkill to have curtains for summer and winter? I feel like making more!

Wednesday, May 16, 2012

DIY: crocheted rag rug part 1


After much thought (and many questions from readers), I've decided to attempt to do a tutorial for how I make my crocheted rag rugs. I was a little hesitant to do one because I think I rely more on feel when I make a rug and not so much on technique, and feelings are really hard to explain when it comes to producing a desired result for someone else. At any rate, I figured I'd try and if there are questions, just feel free to ask. I will say, though, that I am NOT a crocheter. I've never done it except for the rag rugs, so I don't know any technical terms, I only know what Tootsie told me to do and what I've figured out on my own along the way. If you ARE a seasoned crocheter, curse quietly in disgust to yourself. Thanks!

This is part one because I think there's a lot to kind of wrap your head around when first starting. First, you should gather your materials. So your shopping list should include:
  • Getting some thrifted bed sheets. I try to stick with cotton since flannel is too thick and I think silk would give a really odd effect to the stitches (too open). I also think lighter weighted worn-out cotton is best, but generally, it's just whatever colour or pattern catches my eye or what I think would work with other colours I have. You can also get any size you like, it's just going to effect the amount of that particular colour or pattern you have. You can also use any spare cotton fabric you have lying around. It doesn't necessarily have to be a sheet. Finally, I always wash them before doing anything. That's kind of a 'duh' suggestion, isn't it?
  • Next, you'll want to pick up a crochet hook. I thought I lost the one Tootsie gave me and did a lot of searching for a new one, but thankfully I found it. Anything too small or too large just felt so wrong. The size is 1/9-5.50 MM and the brand is Boye U.S.A. In my quest to learn more about crocheting rag rugs, I noticed a lot of people using really big fat crochet hooks. I would assume these people are the crochet experts who've moved from crocheting with yarn to rugs because (as best as I can figure) the size of the hook determines the size of your loop (as you loop over the hook, you pull it to that size), that gives you an even sized loop all the way around. So this is one area that I gauge depending on how the rug is circling. I could get a fatter hook to help with this process, but I'm really unwilling to go against what I was taught. If Tootsie made gorgeous rugs with a small hook, so will I.
  • You'll also want a needle and thread, but I assume most of us have that at home already. Any size needle is fine and any colour thread that blends with all your fabrics will do. I tend to use a cream coloured thread. You shouldn't be able to see much of it anyway since this is how I join different sheet colours together.
  • Scissors, of course!
Now you're ready to rip up your sheets! This is probably the most tedious task and I really don't like it because of the amount of dust that's created. It may sound silly to you, but I always wear a mask when I do this. I have a history of lung problems so I don't want to breathe in sheet dust as well (and you'd be surprised at how much fluff will be on your clothes afterwards so just imagine breathing it in at the same time). Some sheets are worse than others, but I'd rather be safe now than sorry later. I also try to do the ripping in my craft room. It's tempting to do it on the couch while watching tv, but then the couch will be covered in fluff and the room will be dusty. So I just knuckle down and get it done whilst staring at the wall. And I do it when Idle Husband's at work cuz he hates the sound of ripping sheets, and your significant other might hate it, too. It is a really terrible sound, but it's not really that annoying if you're the one doing it!


I usually start on the hemmed end and cut a slit in the sheet all the way down through the thread of the hem. The width of the strip should be around 1 1/2 - 2 inches, but I'm never precise with it. From there, you only have to pull and the sheet should rip straight down.


Once you reach the other end, stop a few inches from the end (I like to leave a lot here so when I'm crocheting, I don't accidentally pull too hard and rip the strip off),


and cut another slit in the fabric about the same width as the first one. Now you can rip the sheet straight up, from the bottom hem to the top.


Keep repeating this back-and-forth process until you get one long strip of fabric. Now you've essentially made yourself sheet yarn. I roll these up into balls so they stay tidy. It's helpful to get rid of any stray strings you find hanging about, too. I didn't do that on some of my first sheets and loose strings can be a real pain to work around.


I like to leave the hems intact and, as I'm crocheting, I pull out the string and open the hem. Then I rip it about half an inch to the end which gives me another 4-6 inches of fabric depending on how wide the hem was. Plus it does double duty as a safety stop on one end as I'm ripping. It's really easy to get overzealous and rip a strip straight off instead of keeping them all together. If you do that, don't worry! It's still usable! I'll talk about joining strips together later.

I hope you get some fabric ripped up cuz next week, I'll show you how to start a circle!